Guest Blogger Alert! Wooooooo!! I've never done this before so I'm super stoked to introduce my first guest blogger - Jordan Kinley.  I met Jordan a few weeks ago through my good buddy Andrew.  Although Jordan lives in Portland, he was in New York working with his film company Into The Woods. Within the first five minutes of meeting, we started talking about grilled cheese sandwiches (typical, i know) and Jordan proceeded to blow my mind with a little concoction he invented one late and bent night. I knew this ridiculous GC needed to be on my blog so Jordan and his friend Miliken (both of Into the Woods) came over and taught me how to make it.  Watch the magic happen...


When explaining the sandwich, Jordan said "i don't know what else to say except that i first made it at 2am one night and it was one of those things that was either going to be really good or really bad. The first prototype was just Pop-Tarts and bacon. and that was good but i thought it was a little bit white-trash so i decided to class it up with brie and pear. The first few people i made it for were totally disgusted by the idea of it and laughed at me up until the first bite"

Class it up, was right.


Ingredients

- 2 cinnamon sugar Pop-Tarts
- 2 slices of pear
- 4 pieces of organic maple bacon
- 4 slices of brie


The way you make this grilled cheese is just as unique as the ingredients he chose.  The first thing you'll want to do is to start to pan-fry the bacon.  Put your heat on medium-low and lay the bacon in there. 


You'll want to crisp the bacon up on both sides but right before it' done you'll want to lay the Pop-Tarts on top (frosting side up) of the cooked bacon.  Jordan recommends flipping the Pop-Tarts onto the frosting side at the very last moment and grilling it for about 30 seconds because of how quickly it melts. 


After you've grilled both sides, you'll want to add the sliced brie onto the frosting side of the Pop-Tarts.  Because brie is such a soft cheese, it melts pretty quickly so it should only take about another minute or two before you'll need to take everything out of the pan.


After you've scooped out the 'tarts, it'll be time to add the sliced pear to one side of the sandwich. 


Then add the bacon!

Look here's Jordan!

And now top it off with the other poptart, frosting side down.


Crazy, right??  Believe me, it's in your best interest to try this glorious creation.

Here's the video that Jordan & Miliken of into the woods shot after leaving my kitchen and blog sesh. Check it out - featuring the young prisms!


Special Thanks to Jordan Kinley & Miliken Gardner for wasting their morning and lugging all their gear over to my place.  Make sure to check them out their website http://intothewoods.tv/  and you can also find them on Facebook and Twitter too!

xoxo,

GCS


I had candied bacon for the first time at Egg in Williamsburg a few months ago. It was the most delicious and orgasmic meat I've ever had and I couldn't get enough of this stuff! So obvs I've been thinking about it ever since then. Finally, enough was enough, I couldn't take it any longer - I just haaaddddd to make a grilled cheese with this stuff.  This morning I ended up going to the Union Square Greenmarket and went crazy!  Here's the nom nom nom nom resultzzz.


Here's what I used!


Ingredients
 
-2 tabs salted butter
-1 tbs pickled jalapeno's
-a few slices of cave-aged cheddar cheese
-3 slices of organic candied bacon
-1 whole grain croissant sliced in half


This was the first time I made candied bacon but it was super easy.  I followed Paula Deen's recipe and I was very impressed!  It takes about twenty-five minutes to make this stuff so make sure you give yourself some time before you start to make this sweet and spicy grilled cheese.

So while I was at the Union Square Greenmarket I found this awesome cheese vendor - Bobolink Dairy & Bakehouse. They handcraft their cheese right out of New Jersey and they were super helpful.  I was talking to them about their cheese and I learned something interesting about white cheddar vs. orange cheddar.  I had no idea orange cheddar was just colored that way to mock the natural color of the cheese that's made in warm months. What it boils down to is that in the spring and summer months the animals have a diet that contains more beta-carotene and it makes the cheese a more orange-y color.  I guess that people started to color their cheddar in order to make it appear that it was produced during the tastiest months.  Crazy, HUH!?

Anyways, get yourself some local cheddar and slice it up and put it on your croissant!


After you get that done, try not to snack to much - break up your bacon and lay it on top! Try to lay it evenly so the sandwich will grill nice and pretty once it's all put together.


Now it's time for the pickled jalapeno's!  I love these things but I've had a hard time finding some at Whole Foods that I was really impressed with, so I  made my own sorta made my own.

I am absolutely obsessed with McClure's Pickles and they are made out of my lovely borough - Brooklyn!  I know they're expensive and every time I throw down $12 for a jar of 'em I sort of die a little inside, then I eat one and I'm totally revitalized (thank god for my mom, who buys them when she visits!)!  Whatevs though, they're so good, I think it's worth spending that much money because you can use the brine to pickle other things once you've devoured everything in the jar!

If you check their website they give you some recipe's. Once I read their McClure's Round Two I decided I had to do it. Wayyy, wayy, way too easy not to. So I threw in some pre-sliced jarred jalapeno's into the brine and two weeks later I had these little beaut's! And of course, I threw em on the GC.


Eeeek! I only added a few jalapeno's because I'm kind of a baby about the spiciness of these little suckers, but feel free to add however many you can eat!  Now put on some more cheese and you're almost done!


After that, you're going to want to slice off the top of the croissant top so you can eat an evenly grilled sandwich.


Now lay it on top!


You'll want to turn your stovetop to a very low heat and melt 1/2 tab of butter in your pan and put the sandwich in.  As it's heating up, take this time to butter the top slice.  I know the croissant is already super buttery, but this is still necessary to get that crispy golden goodness.


Golden brown yet?? Flip it!


Then when it's like that on both sides, take it out and serve it immediately!


This sandwich is not only buttery, creamy, smooth and crunchy BUT it's also sweet and spicy!  I think this grilled cheese is perfect for when you can't decide what you want because it's EVERYTHING YOU COULD EVER WANT! haha seriously though.

xoxo,

GCS


I saw something somewhere about a danklicious smashed meatball grilled cheese and I thought it was an awesome idea.  I totally forgot about it for a little while until yesterday when I was at Trader Joe's.  They had this amazing looking Asiago that's flavored with rosemary and olive oil. YUM, right? So anyways, I had to buy it and make this little meatwad baby for you guys.  I would normally give a shout out here to the recipe that inspired it, but I can't remember :( meep.


So to make this little baby you're going to use :

Ingredients

-2 slices of Eli's onion bread
-2 pads of real salted butter
-1/2 cup of shredded rosemary and olive oil Asiago
-2 cheese stuffed meatballs


I guess I should begin by telling you about the meatballs.  I used trader joe's grass fed beef, an egg, some panko, finely diced onions, garlic, and basil, salt, pepper, and this awesome seasoning that I use on about everything.... and it's called Instant Gourmet.  I combined everything and rolled 'em into little balls and shoved a small chunk of the asiago in the middle.  Once they were shaped, I sprayed some pam into the pan and cooked the meatballs, turning occasionally until the cheese started to ooze out.

Oh, and if you don't wanna try to wing it with my vague recipe, use this cute little recipe from my good friend Ashley at Lovely Little Vices.

But once you have them on hand, go ahead and pile half of the cheese onto one slice of bread.


NOW SMASH YOUR MEATWAD!


Then center it on top of the cheese.


Now pile on the remaining bit of Asiago.


And put on the top piece of bread.


BUTTER.


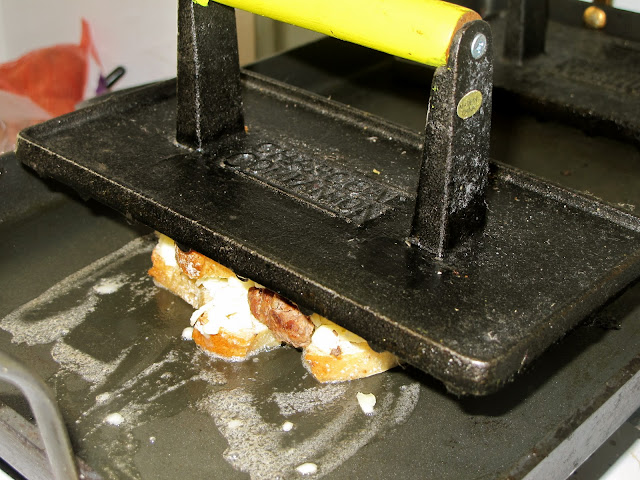
At this point you'll want to melt the other pad of butter in the pan because it's way tooooo hard to try and flip it before it's melted.  Once it's creamy go ahead and put the sammie on the butter and put the press on top.  If you don't have a metal press, you can use a heavy pan or a tinfoil wrapped brick or something.


Once it gets nice and puuuuuurdy, flip it and put the press back on top!


When it' equally golden on both sides, take it out of the skillet and slice it!


Although this is a really flavorful grilled cheese, I thought it would be even better dipped in some marinara sauce... and i was right! So pair it with some delicious sauce and have a super fun party time and gobble up this meatwad of a grilled cheese.

Oh, and keep livin' large, boy, keep living large.

xoxo,

GCS


Halloween is right around the corner and i've been trying to come up with some spooky concoctions for a creepy new Halloween Grilled Cheese. Luckily for me, some of my amazing followers (thanks Susan and Mark!) hooked me up with some crazy green pesto gouda from Amsterdam.  It was really tasty and it works wonderfully for any late night munchie sesh's and/or Halloween parties!


You gotta see this cheese before we start.... When I was handed this, I was like "WHAT!".  I thought it was some weed laced cheese from some coffee shop that they smuggled in, but nah, it's just some serious dank cheese that is colored from the pesto.  Coulda been a good story though.


Anyways, now it's time for the other spooktacular ingredients:


- 4 large slices of gouda pesto verde
- 2 tabs of salted butter
- 4 sliced cloves of garlic (sauteed in olive oil)
- 1 tablespoon of julienned sun-dried tomatoes
- 2 slices of organic miche bread
- 2 ts garlic salt


Once you have everything out, go ahead and put on two slices of the cheese on top of a slice of bread.  Once it melts, it'll look like some goopy slimy mess. YAY!


 Then mix together the sauteed garlic and sun-dried tomatoes and sprinkle them on top.  The sundried tomatoes look like some bloody nastiness and the sauteed garlic looks like chunks of skin...Perfect for creeping everybody out!


Then add the last of the cheese.


Now it's time for the topper. Add the other slice of miche on top.  This is the first time I've ever had organic miche and it was absolutely delicious! I got it at Amy's Bread in Chelsea Market, and it's a mix of wheat, rye, and sourdough, with a super dense middle and a crunchy crust.


Next, butter the bread, sprinkle on half the garlic salt, and turn your stove top to a medium low heat.


Before it's all the way heated up, lay your sammie butter side down.  Then butter the other side and sprinkle with remaining garlic salt.   Each side will take approximately 3-4 minutes for the bread to brown.  Once browned, flip it!


When it's like that on both sides, take it out of the pan and let it sit for a minute.  You'll want to do this because the cheese gets super gooey and if you try and cut it, it'll all ooze out.


Doesn't it look like slime!? Eeeee! I love Halloween, it's my favorite holiday and this is the perfect munchie for this time of year... and you don't have to be high to enjoy it!


Happy Halloween, spook somebody!

xoxo,

GCS


Although I typically stray from the average when I'm creating recipes for Grilled Cheese Social, I think that the basic grilled cheese that we all grew up loving is just as good as any fancy sammy I come up with. This recipe will provide the back to basics approach and explain why I do what I do when I'm creating these childhood favorites.


So of course, I couldn't just do the regular standard grilled cheese but believe me it's still as simple and delicious as you remember!


I used:

-2 slices of muenster cheese
-2 slices of sourdough bread
-a pinch of garlic salt
-enough butter to cover the bread

So after I gathered all my ingredients I tore the cheese in half to fit the slices of bread. If you don't do this you will find that the cheese oozes out everywhere and will start to burn (and that ain't good!). I like to center my cheese more in the middle to allow it some room to melt without seeping onto the pan.


Then I simply put the other piece of bread on top, smeared some yummy REAL butter all over it, and then added a little bit of garlic salt to the buttered sides. I chose butter on this classic because it's the typical fat we think to use when making grilled cheese. Butter provides a rich, creamy, and crispy texture that also functions as a great medium to slowly brown your bread. You might have noticed that I use sometimes use olive oil instead of real butter. I don't really have a rule on this method, but I tend to associate olive oil with more rustic type sandwiches. Olive oil is also easier to use because unlike butter, you don't have to wait for it to soften and you can just drizzle it on your griddle.


Once the sammy was put together I heated my griddle pan to a medium high heat. I use a double burner griddle pan similar to this one by Anolon (shhh.... I got mine from TJ Max for half the price).  It features heavy gauge hard anodized non-stick aluminum, SureGrip handles which are durable and ergonomic and provide a soft, cool confident grip, and is big enough to make about six grilled cheeses at a time. I chose this model because I'm pretty much a broke grad student and I thought it offered the most bang for it's buck!

The heat I chose also varies depending on which type of cheese you use. for soft cheeses like brie, tallegio, or goat cheese I typically use a higher heat because it doesn't take that long for the cheese to melt. For firmer cheeses like gruyere, cheddar, or manchego I use a lower heat to allow it to melt evenly. I also use a lower heat if there are more ingredients, as to warm everything evenly. Also if you're unsure which setting is best to use I would stick to using a medium-low heat because it's the safest bet.


After it was golden brown on one side, I flipped it. At this point I sometimes incorporate a cast iron grill press into the mix. I do this when the sandwich is too big to feel confident about the flipping the sammy. The press flattens the sandwich enough to help the cheese bond to all the ingredients together so it won't fall apart when you flip it with your spatula.


When both sides were equally golden brown I took it off the skillet and let it rest for a minute. I did this so that the cheese would have a minute to firm up and not ooze out from the pressure of the knife.  I also thought I owed it to everyone to include the grilled cheese's BFF - soup!  I paired my sammy with a delightful sweet potato bisque that i picked up from trader joe's.  I also cut this little baby into strips to it would be easy and fun to dunk in the soup!


I hope my spin on this classic will warm your belly and your heart, and make ya feel like a little kid again!

xoxo,

GCS