Recently we took our kiddos to see the movie Rango.  First of all, let me say, although I LOVED it myself, it might have been a little too "adult" for my kids.  If they had watched it instead of spending most of their time fighting over the lone pickle, I might have had some explaing to do.

Aside from that, Rango was pretty darn hilarious.  So, I cookie-fied him! 

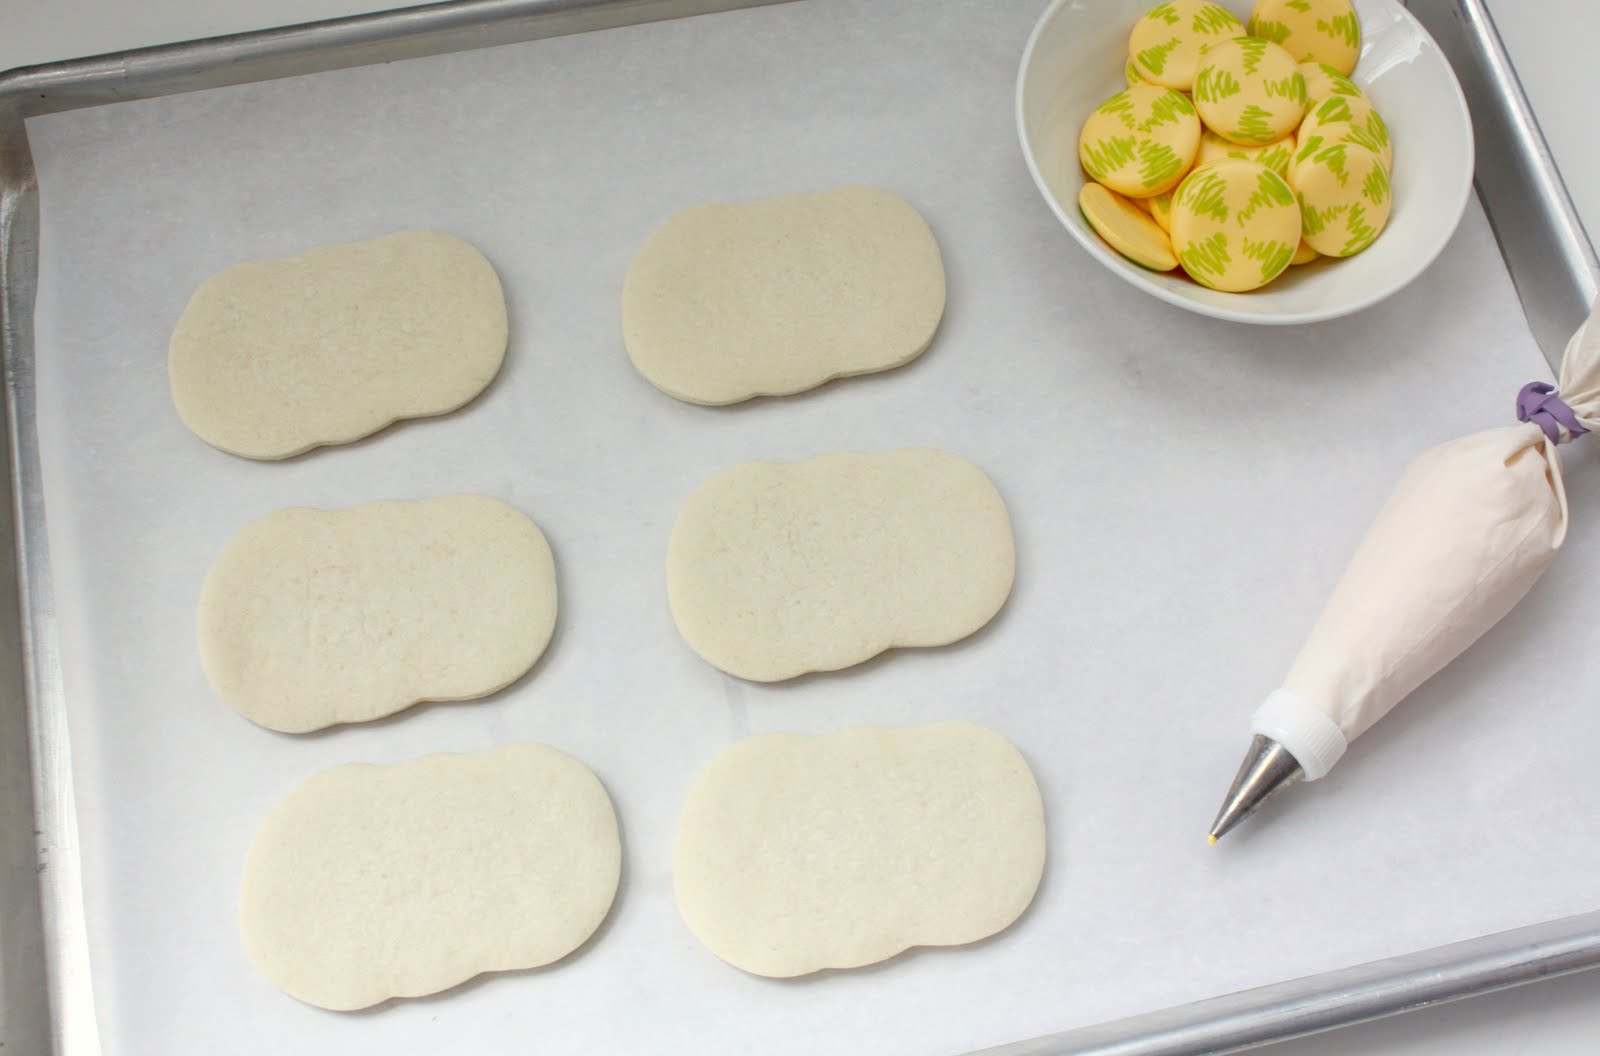
This is kind of a two or three day project, so start early.

The day before, you should bake your cookies.  To cut these, I used a metal dog bone cutter that I stretched out a little.
After the cookies were baked, I spent the rest of the morning making royal icing accents to use as Rango's eyes.  For more information on how to do this, read my post on what to do with leftover royal icing.


I didn't really make the disks an EXACT size, I just used my mangled cookie cutter to gauge how big to make them.

Once you make it here, you are at a standstill until they dry.  This is when I do laundry and other un-fun stuff like that.

The next day, I used Wilton Foodwriters to make the markings around Rango's eyes.
In this tutorial, I used the neon green color, but I'd recommend the dark blue or green below.  Those colors will show up a lot better on the finished product.


Using a Google Image as reference, I made the appropriate markings on the disks.


Now for the decorating

To make Rango cookies you will need:


Begin by attaching the eyes


Then, outline his face...


Then, fill.  When you fill, you are going to want to flood in sections.  Fill one area and let it dry a bit, THEN, move onto another.  This gives your cookie dimension and texture.


See?


 Now, let this part dry completely.  It may take a whole day. *Is anyone beginning to think I am insane yet*

Notice his icing is a little flawed in places.  This wasn't by mistake. The good thing about being a lizard is a bumpy face actually makes you look better, so instead of removing any air bubbles that came up, I left them. 

Too bad this doesn't apply to my complexion!


Pardon the photo gap...I accidentally erased a few important ones, so I had to improvise.  At this point, use a #13 tip to add the ridge above his brow and food color markers to add lip wrinkles...pardon the disgusting description...lip wrinkles was all I could come up with.


Here comes the cool part.  I needed a way to keep the bright yellow color around his eyes "safe" while I sprayed him.  So, I used a regular old hole punch, and applied these dots to the area I wanted to protect.

I made them stick by using the very tip of a toothpick to apply a tiny speck of corn syrup as an adhesive and then attached the dot.  I didn't worry about the corn syrup because ultimately, it ends up hidden.


This is where things get FUN!  Have you ever seen this stuff?!  I use it all the TIME!  It's how I get the airbrushed effect without actually owning an airbrush. {BTW, I plan on changing that REALLY soon}

 I've used it for on many projects like my fruit cookies and my sunset baby feet cookies  it to get a beautiful shaded effect.


SPRAYTIME!

First the blue, then the green.  Don't get carried away.  A little goes a long way.  And word to the wise, do this in a well ventilated area.  It smells pretty ROUGH!


Let them dry a bit, this goes pretty quickly, and then use tweezers or another toothpick to pop off the dots.  See?  I told you it was cool!


Then using your yellow and black flood icing, add little eyes.  Use the #1 tip, and first make a yellow dot, then quickly come back and add a black dot, wet on wet style.


Then use the yellow {still with a #1 tip} to add the last little details...I did nostrils and more lip wrinkles.


I mentioned referring to Google Images before...this is what I meant.  The WHOLE time I am working, this little guy is not far from my side.


Oh yes, and my hubby came up with this idea right after I finished these.  I thought it was cute, so I am throwing it out there.  I even baked a few with some leftover dough, with good intentions of decorating them.  BUT, I ran out of steam and they ended up in the freezer.  I'm sure they will end up making a cameo at some point...

And there you have it...

RANGO cookies

These could look so adorable with bandana print cookies, cactus, or any other Western themed cookies.


Have fun with these.

If you want to make matching cupcakes, my friend Kristan has the cutest Rango cupcakes on her blog.  You should definitely check them out!


First things first.  I promised icing, so today we are talking about icing...I will try to keep it short (emphasis on try) so we can get to the FREE STUFF!

To start with, I am going to give you my top secret, amazing, wonderful, specially-formulated recipe for royal icing. 

Here we go...

To make SweetSugarBelle's Top-Secret Royal Icing you will need:
  • 3 Tbs of meringue powder
  • 4 cups (about 1 lb.) confectioners' sugar
  • 6 Tbs water
That's it!!!

Seriously... this is NOT my recipe. It's the Wilton Recipe, and it's exactly the recipe I use.  Oh, come on!   Don't be a Wilton snob...they didn't become the best known baking/decorating supply company in the US for nothing =)


Beat all ingredients until icing forms peaks (7-10 minutes at low speed with a heavy-duty mixer, 10-12 minutes at high speed with a hand-held mixer).


All joking aside, I do have one tip major tip, FLAVORING!!!! 

When Wilton says water, SweetSugarBelle says liquid.  AS LONG AS IT'S OIL FREE (since oil is the enemy of RI) then you're good.  So if you like orange, make it orange, lemon, throw in some lemon juice.  Vanilla, same thing...almond, coconut, rootbeer... *ICK, WELL MAYBE NOT ROOTBEER*  But really, if there's a flavoring for it, you can make it.

 PS-I fibbed a little bit, I really have two tips.  If you  are after a glossier icing finish, add a tsp or two of corn syrup to the icing while mixing.  It seems to work for me. 

PSS-Oops, fibbed some more.  Even though I use the Wilton recipe, I don't always like their meringue powder. Long story for another day...

PSSS-Fibbed again, last time, you need to see this. It's the  COOLEST ROYAL ICING TIP EVER!  Just read...


Moving on along so we can get to the free stuff...

There is another type of icing that can be used if you're part of the sect that thinks royal icing is pretty icky. It's the preferred icing of CookieCrazie,my cookie friend that I introduced here yesterday.  This is her recipe.


  • 1 lb powdered sugar
  • 1/4 cup corn syrup
  • Flavoring
  • approximately 1/4 cup water
In a small bowl, stir together confectioners' sugar and water until smooth. Beat in corn syrup and almond extract until icing is smooth and glossy. If icing is too thick, add more corn syrup.


I tried this for the first time the other day, and I have to admit I was pretty impressed.  It DOES taste better.

*praying this doesn't not get me marked with a permanent scarlet letter by RI aficionados*

It's also a little easier to work with.  One consistency for everything, and boy does it take color well.  It's the perfect icing for a cookie decorating party, first of all because prep wise, it's very easy to make after you get the hang of it, and it's a two-in-one icing.  It can be used for both outlining and flooding once you get the consistency right.

As for royal, I know people who have worked with it for years, and STILL don't know why it does some of the things it does.     *like me*

One complaint about glaze; when it comes to fine detail work, it's just not the same.  If you want super detail, royal is the only way to go.

             *By the way, if I disappear, one of the RI Mafia "had me scraped"  for speaking against the family =)

I only had one problem with the glaze (besides eating too much of it)  It weirded me out when I was mixing it up.  I didn't know what to expect, really, but as I mixed, it seemed a little dry. So, I took it upon myself to NOT follow the directions, and ended up adding way too much liquid.  If you think you might have the same problem, do what I should have done in the first place, and watch this video on making glaze icing by i am baker. It's WONDERFULLY informative and hilarious =)  Okay, that's it I am finally done!

*WOO HOO, finally to the free stuff! *

I hope I forced everyone to read thorough the entire whole post to get here, *or maybe not* but in any case, I'm really excited about this giveaway!

I'm starting a movement.  I'm going to call it, " No More Frumpy Bakers!"

Truth is, most of the time I can be found in my uniform, a flour covered, royal-icing flecked black yoga suit...  It's unacceptable really...especially with all of the adorable baking gear available now.  So, I've decided, if I'm going to convince others to make cute, amazing cookies, then I'd better help them do it in style!

If you win, here's what you'll get = )

A gorgeous apron to keep you clean while you create...


A pretty set of vintage style measuring cups... (my Nanny used to do it this way)  AND, a nifty set of "Queen of the Kitchen" measuring spoons.

Everyone has two chances to enter:
  1. First, leave a comment on this post telling me whether you prefer glaze or royal icing. (or something else) and  if you can, TELL ME WHY!
  2. Second, hop on over to FB and suggest my SugarBelle's page to your friends.  Then, come back here and  leave me a comment  telling me you  me you did.
BE SURE TO LEAVE YOUR EMAIL ADDRESS WITH YOUR COMMENT, or email it to me.  If I can't contact you, I can't send you your prize.

Also, just for you Tweeters (my newest time suck)  I am offering a bonus entry for anyone who tweets this post. Come back and let me know you did.  *Contest ends Sunday, December 19, 2010 at midnight EST.  The winner will be chosen by Random.org.  Good LUCK


Oh yes, and before I go, I owe everyone some cookies.  I missed yesterday, but I plan on playing catch up tomorrow and offering a quick video tutorial. Come check it out!

This is a Happy Holidays housewarming platter I made for a dear friend.  I moved over the Holiday season myself and cookies are the least I can do! 

*Truthfully, Bourbon would have been more appropriate, I think*

Good luck and Happy Saturday.  Hope everyone can spend it baking!